Crochet Christmas Decorations

IMG_3144

As more and more of my friends have become parents over the last few years, I’ve found myself having to buy Christmas presents for increasing numbers of children. As a parent myself, I struggle with the influx of toys my children receive each Christmas and birthday. So, for the last few years, I’ve decided to cut down on the festive toy buying for friends’ children, and have instead given each a small Christmas decoration.

The first year, I supported a friend’s small crafting business and bought some handmade felt decorations. Last year Pumpkin and I did a little crafting together and made homemade salt-dough style decorations, and this year I decided to indulge in a little hooky time to compensate for all this knitting I’ve been doing.

Last Christmas I was given a crochet magazine with patterns for some ‘Scandi Decorations’, so I used some of those and also made up a couple of my own patterns along the way.

IMG_3134

Unfortunately I’d already wrapped some, including my intarsia reindeer design that turned out rather well, before I thought about taking pictures.

IMG_3138

The round ones turned out to be my favourite, so here’s a very quick write up of the pattern for you.

Yarn: Rico creative cotton Aran

Hook: 4mm

Embellishments: A variety of buttons and felt garlands from Hobbycraft

Toy stuffing

US terms

Round 1: 10sc into magic loop, pull circle tight and slip st into first sc to join

Round2: ch1,  2sc into each sc around and join (20 sc)

Round 3: ch1, [*1sc, 2sc in next sc], repeat from * to end of round and join (30sc)

Round 4: ch1, [* 1sc, 1sc, 2sc into next sc], repeat from * to end of round, join and finish. (40sc)

This is your front piece – sew on any embellishments you choose at this point.

Choose a contrasting colour and make a second circle as before, up to end of round 4. Join, but do not finish.

Round 5: Turn, ch1, holding the two circles with wrong sides together, and beginning at the top of the ‘front’ piece, sc around to join the two together, making sure to go through 1 sc from each circle for each stitch. Stuff lightly with toy stuffing when you are about 3/4 of the way round. Join yarn at the end. (40sc)

To make a hanging loop, chain 18-20 st, then join at beginning. Cut yarn with a tail and weave in.

IMG_3136

All that is left now, is to wish you all a very happy Christmas!

Cosy cables

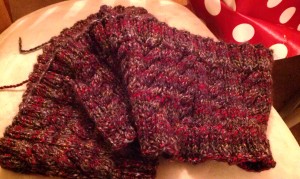
So it seems my last post was quite possibly the most boring post imaginable. Let’s go back to knitting. In fact, let’s go back to around this time last year when my sister half-jokingly asked me to make her a new hat. I had only just learnt to knit at that point, and already had a crochet project on the go (and it still is, though there’s perhaps less of the ‘go’ about it) so didn’t want to take anything else on. Fast forward to this autumn, just as the weather started getting colder and I suddenly recalled my sister’s request.

By the time I spoke to her about it, she’d actually already bought herself a new hat, but now wanted a scarf/cowl/snood to go with it. We both trawled Ravelry for suitable patterns, but finding nothing that quite fitted the bill, she brought me the hat instead and I took inspiration from that.

IMAG2109

Having already tackled cables for Hermes’ scarf, this looked fairly straightforward, so I took note of the pattern repeat, and guesstimated a rough measurement of how long it would need to be, and started from there. My sister had chosen a ball of James C Brett Marble Chunky, so I had 200g to play with.

I cast on 264 stitches in the round, and began with a section of 2×2 ribbing. The cabling section had an 11 stitch repeat; K3, P1, Cable across 6 Knit stitches, P1. I crossed the cables every 4th row (more or less – it’s easier to lose track when working in the round rather than back and forth). I then finished off with another section of 2×2 ribbing.

IMAG2224

Mostly it was very plain sailing, but I encountered a bit of brain mush in the middle of the cabling section and had to frog a couple of times which was very frustrating. After that I stuck in a lifeline every few rows which was most certainly wise.

I had calculated that I would use 50g for the first ribbing section, 100g for the cables and 50g for the second section of ribbing, intending to use the entire ball if possible. I actually ended up with a fair amount left over, as I should have done one more repeat of the cables before starting the ribbing again, but I was unsure at the time whether I would have enough for that. Ah well. My only other regret was that, as with Pumpkin’s socks, I should have gone down a needle size for the ribbing as it’s a bit too loose in comparison with the cables. Unfortunately that means it turns out at the edges and sits a bit funny when being worn, but I’ll give it to my sister and see whats she thinks of it anyway before I start frogging the whole thing! Maybe next time I’ll remember.

IMAG2223

Now my hooks are back out of hibernation and I’ve just got a couple more Christmas decorations to crochet to make it into parcels in time for tomorrow’s last posting date!

Recovering a chair

Several years ago, I acquired a small swivel chair through Freecycle, which I use for sitting at my computer. In recent months it was definitely beginning to get a little worse for wear until the cushion on the backrest parted company from the rest of the chair in a pretty terminal way. Not wanting to discard what was otherwise still a perfectly serviceable chair, and because I clearly don’t have enough other projects to be working on, I decided to see what I could do to remedy the situation.

It took a little work to get the plastic cover off the back of the chair, but with a pair of pliers and some brute force I managed it without breaking anything.

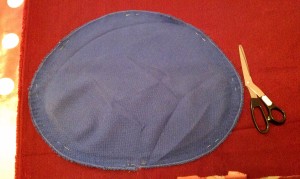
I used the original fabric cover as a template which I pinned to some upholstery fabric and then cut round it giving myself a couple of centimetres of extra fabric all the way round.

IMAG2195

IMAG2196

I thought it might be sensible to do a zigzag stitch around the outside edge as I wasn’t sure how much the fabric might fray, and I didn’t want it all unravelling inside the chair after it was all put back together again. I probably should have done it a bit closer to the edge, but since this is only the second time I’ve actually used my sewing machine, I thought that was forgiveable.

IMAG2198

I then folded the edge over and pinned it to form a narrow channel all around the outside. I stitched this (twice for extra security!) leaving a small gap at the bottom, and then fed a piece of string all the way round.

IMAG2200

Then it was just a case of putting the foam in place and the cover over the top, and pulling the drawstring as tight as possible.

IMAG2205

I fired a couple of staples in for good measure (it was stapled originally too) and popped the plastic cover back into place, and voila! tis a smart and comfortable (though somewhat mismatched) chair once more!

IMAG2212

Maybe I’ll do the seat to match the backrest too, one day!